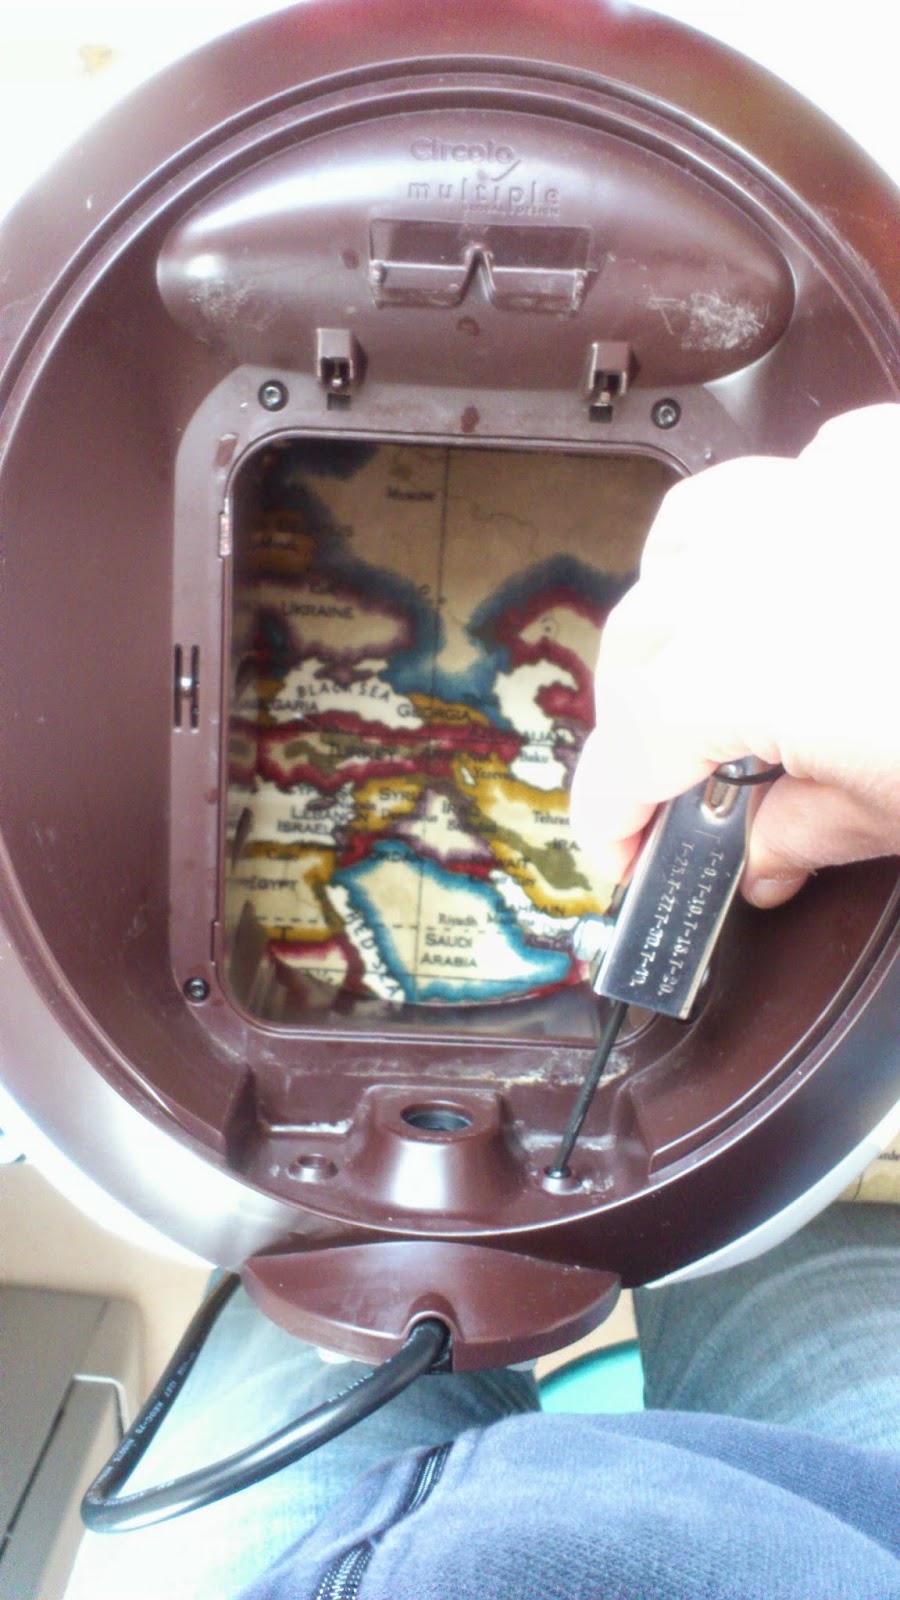
My Dolce Gusto coffee machine started leaking without even plugin in to the socket. Water was leaking at the base, the tank would get completely empty in a few seconds, so I dismounted the back cover to see.
Use a Torx tool.
Fisrt start removing the two screws down besides the reservoir connector.
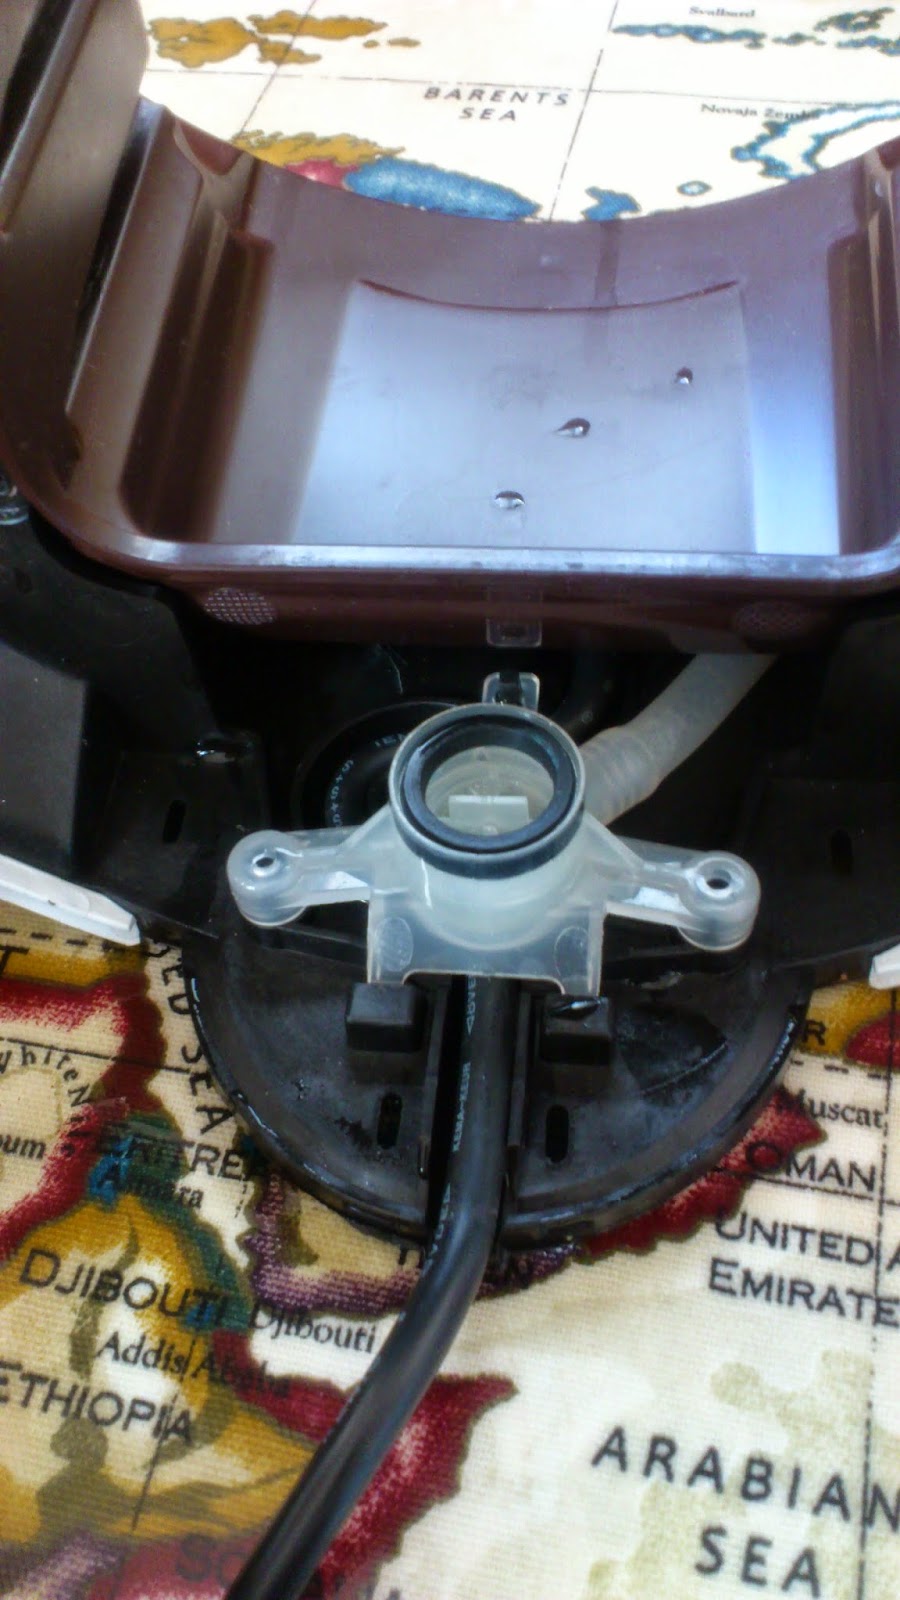
Down there you see the join inside the water connector. That small rubber joint was apparently in a good shape but the problem really came from it.
I took the small water filter and descaled it by diping it in white vinegar for a few minutes.
Then I took a rubber tap joint from my tool box and put it on top of the rubber joint as you see it in the circle. Then I mounted all back again and it works! The joint was just too used, and you can replace it with a tap rubber joint, just find the right size.
Descale the coffe machine
This is always a good thing to do every two or three months to keep the inside clean.
I descaled completely by filling the water tank with a mixture of water and 10% of white vinegar, I inserted the empty capsule holder and pressed the lever as if I were making coffee till the tank was empty.
Then I filled the tank again with fresh clean water and repeated the process to rinse.
And here it is! Making coffee again!


Hi Maria.
ReplyDeleteI have the same problem but the torx screws have a small portrusion inside that prevents the tool from unscrewing the mount. Did yours have the same issue?
Hi,
ReplyDeleteMine were standard torx screws, yours seem to be the security torx kind. You may have to find a special screw driver to remove these.
I have the same problem, so if anyone knows the type of tool you need and where to get it, I'd be grateful.
ReplyDeleteHi Frank, you need a torx screwdriver, you can get them at Amazon or Ebay :)
ReplyDeleteThanks for the images. Sorted my machine out great. Had to use a TR10 screwdriver as the T10 would not work ��
ReplyDeletehi
ReplyDeletetook my screws out but how do you then part it?
cheers
To set it appart you just have to push gently. Just make sure that all screws are off.
ReplyDeleteThis hasn't worked for me and I can't find where the leak is coming from (at the bottom) any suggestions?!
ReplyDeleteDo you still recall what were the sizes of the rubber tap joint to put on top?
ReplyDeletethanks
Just use a small flat head screwdriver and don't put the screws back as they aren't needed. The clips hold everything in place.
ReplyDeletethank you! i have not the appropriate screwdriver, yet, but it was the information that helped me! cheers!
ReplyDeleteI have the same problem. It seems what happens here is that seal at the bottom expands and pops off of the screen/filter and then doesn't seal against it. In other words the seal becomes too large and water leaks through.
ReplyDeleteThe entire plastic "receiver" at the bottom is actually quite cheap (part# WI1528 and around $8-10) and it seemingly comes with the seal but the problem is I'm not sure where to get it in Can/US. You can get them from Europe but you have to pay like $25 in shipping to get it here so that's a bit out of the question. The seal itself seems to *possibly* be the same as Krups part# MS-0907124 which can be found for 2-4 GBP online but again shipping is an issue, though perhaps a small-appliance repair shop may be able to sell you one? I couldn't find any online retailers selling in Can/US though.
The "tap joint" used as a solution here seems to be just an o-ring, no? I went in my o-ring kit and found a metric # 114 (or P16)o-ring and put it between the [expanded/leaking] seal and the screen as mentioned here. Leak seems to be solved just as Maria shows :) I filled the reservoir all the way to put the max pressure on the seal solution and seems not leaking now. Basically the expanded original seal plus the o-ring stops the leaking--amazing little things o-rings are. Thank you Maria for this wonderful solution!!!
However the connection seems to leak much more readily on the "top" (above the plastic assembly you remove to do the repair, instead of through the unit and below like it leaked originally). However this only happens if I move or jostle the unit when it has water in the reservoir. If it's still it works fine and no leaks! The "true fix" would be to get the original seal but until I find one of those without a crazy shipping charge, the o-ring will have to suffice.
As a side note, mine did have security torx on it. I could actually get all but one off with a regular torx bit though. But that one caused me to have to go to the store to get a security bit set for $10.
I added an additional rubber joint on top of the original one, put everything back together but the water was still leaking but a bit differently. I tried adding another smaller joint to the bottom of the water container and now it seems to work! Thanks for advice this is the only place that actually helped me
ReplyDeleteI fixed the same problem on my circolo with thread gasket tape, just put approx 40 centimeter around the top of the white plastic base, half way over the top, and carfully fold it down around the inside and put the original gasket back inside with the tape in between. It makes a tight seal and the tank fits much better.
DeleteNice blog!
ReplyDeleteAre you searching for a service center in Dubai for your Macbook?? Scorpionfix is here, one of the best apple service center in dubai.
Macbook repair Dubai
laptop repair Al Mouj
laptop repair Al Hail North
Macbook repair Muscat
Macbook repair Oman
Apple service center Muscat
Apple service center Oman
Hi what size of the rubber rings did you use? Trying to find it on Amazon ty🙏
ReplyDeleteHi, I hope you have find the solution, as for the size I bought a set with several sizes it is cheap, and tried some of them
Delete